3 Free Ways to Record a Screencast

Knowing how to create screencasts is a useful skill to enhance your presentations, record instructional tutorials, or produce compelling online content. Screencasting allows you to record your screen while simultaneously capturing audio, making it ideal for explaining complex concepts.
In this article, we will walk you through the process of screencasting, from choosing the right software to sharing your final product. Whether you're a teacher looking to create online lessons or a business professional wanting to showcase a new product, this guide has got you covered.
What is a screencast?
A screencast is a type of video recording that captures everything happening on your computer display. It includes both audio and visual components, allowing you to demonstrate something and explain how it works.
Screencasts are great for creating tutorials, online courses, explainer videos, or sharing presentations. They provide a more interactive and engaging way of teaching compared to written instructions or screenshots.
These recordings typically include audio commentary, providing explanations or insights as the viewer watches the recorded screen activities.
Method 1. Icecream Screen Recorder
One of the best programs to create a screencast on Windows is Icecream Screen Recorder. It allows users to record screencasts, take screenshots, and perform basic editing on the captured content.
Step-by-step guide:

- Download the screen recording software and install on your Windows PC.
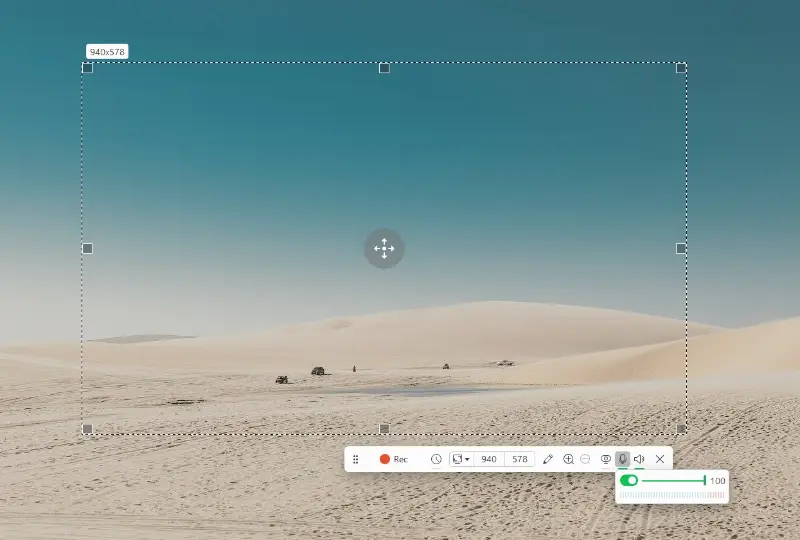
- Launch the application and select "Capture video" from the main menu.
- Select the recording area. If you choose "Custom area", drag and resize the frame to fit your desired area.
- Adjust the audio settings by clicking the microphone icon and setting the volume level.
- Press the red "Rec" button to start recording.
- Once you are done, click "Stop" or press F8 on your keyboard.
- You can now preview the result and edit it if necessary.
Pros:
- Ease of use. The screen capture software offers an intuitive and user-friendly interface, making it accessible to users with varying levels of technical expertise.
- Recording options. Users can capture the entire screen or select specific recording areas, providing flexibility for different types of screencasting needs.
- Audio recording. The software allows for simultaneous audio recording of system sounds and microphone input. This helps to create narration or commentary for screencasts.
- Zooming. The zoom tool can be useful to focus on specific details, providing a dynamic viewing experience.
- Drawing panel. Real-time drawing capabilities enable users to emphasize points or provide additional visual explanations during the recording.
- Scheduled recordings. The screen recorder offers a scheduling feature. This allows users to automate the start of screen recordings at specific times.
Ultimately, Icecream Screen Recorder proves to be a dependable solution for creating screencasts. Its intuitive interface, multiple recording options, and robust editing capabilities make it a top pick for numerous users.
Screen Recorder
Easy to use free screen recorder for PC. Record desktop, take screenshots, upload the created content to the cloud for easy and fast sharing. Free Download

Method 2. OBS Studio
One of the most popular and reliable tools for screencasting is OBS Studio. It is widely used by content creators, gamers, and professionals to capture and broadcast their computer screens.
Step-by-step guide:

- Download and install OBS Studio on your computer.
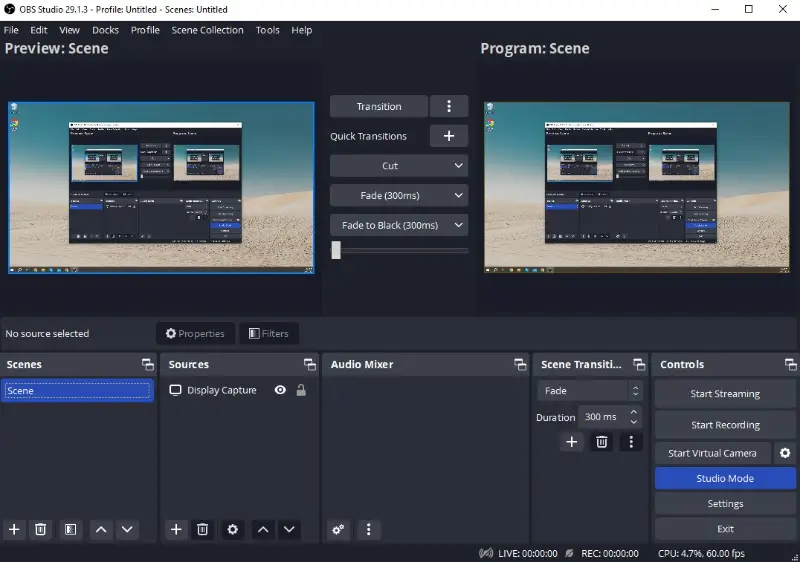
- Open the application and click the "+" button under the "Scenes" tab to create a new scene.
- Press the "+" button under the "Sources" tab to add your desktop screen, webcam, or audio.
- Hit "Start Recording" to begin screencasting.
- When you are finished, tap the "Stop Recording" button or press the hotkey that you have set.
Pros:
- Open-source. OBS Studio is free to use, making it accessible to a wide range of users without the need for a subscription or license fees.
- Multi-platform support. The free screen recorder is available for Windows, macOS, and Linux, ensuring compatibility across different operating systems.
- Multiple sources. Users can incorporate several sources into their scenes, including screen captures, webcam feeds, images, text, and more. This flexibility enables users to create dynamic and layered compositions.
- Scene transitions. The program supports customizable scene transitions, allowing for smooth shifts between different scenes during live streams or recorded videos.
- Audio mixer. The software includes an audio mixer that allows users to control and mix multiple audio sources, including microphones, system sounds, and more.
Cons:
- No editing tools. The screen recording software primarily focuses on capturing and streaming content, lacking a built-in video editor.
- Complex for beginners. The extensive features and customization options can result in a steeper learning curve for users who are new to screencasting or broadcasting.
- Resource intensive. Users with lower-end hardware may experience performance issues, especially when streaming or recording at higher resolutions.
In conclusion, OBS Studio with its multiple sources, customizable settings, and effortless export capabilities, it's the preferred choice for many content creators. While it may seem overwhelming at first, with some practice, you can create professional-looking screencasts using it.
Method 3. ShareX
ShareX is a free and open-source screen capture and recording software for Windows. It is preferred by many due to its user-friendly interface and advanced features.
Step-by-step guide:

- Download and install ShareX from its official website.
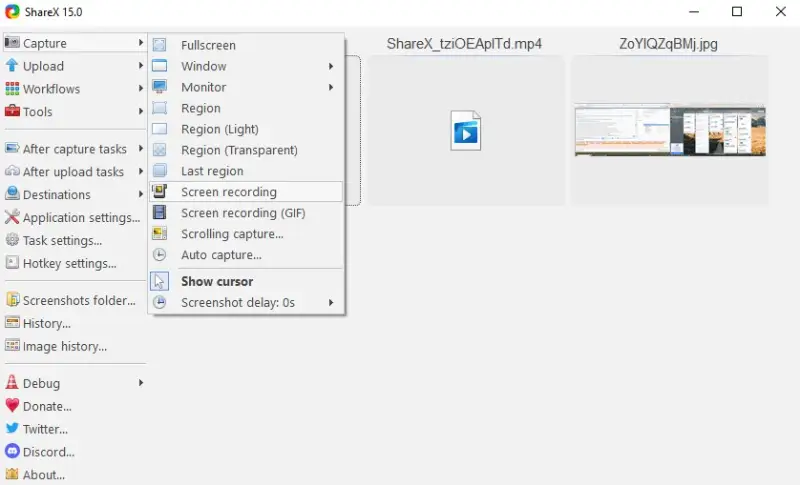
- Open the program and go to the "Task settings" menu.
- A new window will pop up with various options. Choose "Screen recorder" on the left and click "Screen recording options".
- Add the input device in the "Audio source" drop-down menu.
- Now, you can go back to the main menu. Here, click "Capture" and then "Screen recording".
- Once you have finished, your screencast video will appear in the "History" tab.
Pros:
- Versatile capture methods. The program supports various capture methods, including full-screen, region, scrolling captures, and more, providing flexibility in content creation.
- URL sharing. The screencasting software can automatically shorten links for shared content. This can streamline the process of sharing screenshots or screencasts.
- Workflow automation. Users can create custom workflows and automate repetitive tasks, making the application efficient for those who need to capture content regularly.
- Customizable hotkeys. The open-source screen recorder allows users to define custom hotkeys for various actions. This makes it convenient for quick and efficient screen captures.
Cons:
- Learning curve. The amount of configuration options may be overwhelming for users looking for a more straightforward way to record a screencast.
In conclusion, ShareX is a great tool for screencasting as a result of its advanced features and no cost. It is ideal for creating tutorials, presentations, or recording gameplay footage.
When you can use screencasts
Screencasting has become increasingly popular in recent years, especially for educational purposes. But when exactly should you use screencasts? Let's take a look.
- For software demonstrations. Screencasting is perfect for demonstrating the functionality of a specific software or app. You can easily record yourself navigating through the interface and commenting on its features.
- For online courses. Screencast videos offer an effective method for delivering your webinars or online lessons if you're an educator. You can record yourself giving lectures or demonstrating processes, providing your students with a more engaging learning experience.
- For product reviews. Are you a blogger or influencer writing about technology or software? Instead of just describing the features of a product, why not create a screencast to show your audience how it works? This adds an extra level of credibility and helps your viewers better understand the product.
- For troubleshooting. Sometimes, it's easier to show someone how to solve a problem rather than trying to explain it over the phone or through text. With screencasting, you can easily demonstrate step-by-step solutions for technical issues, making it easier for others to follow.
- For presentations. Traditional slideshows can get boring, but with screencasting, you can add visual elements and make your presentation dynamic. You can also include live demos of software or websites to make your presentation more interactive.
- For customer support. If you work in customer service, screencasts are a useful tool for providing personalized assistance. Instead of sending long emails with instructions, simply record a screencast and walk your customers through the process visually.
As you can see, there are many situations where screencasting can be beneficial. So, don't hesitate to give it a try and see how it can enhance your work or studies.
Tips for creating screencasts
- Clearly identify the objective of your screencast. Are you teaching a concept, demonstrating a process, or troubleshooting a problem?
- Write a script or an outline of what you will cover. This helps to stay organized and ensures you don't miss any important points.
- Make sure your recording environment is free from background noise to ensure clear audio.
- If you are recording yourself along with the screen, check if the lighting is good. Natural light or a well-placed lamp can help.
- Close unnecessary applications, disable notifications, and clear your desktop to avoid interruptions and keep the focus on the content.
- Hover your cursor deliberately and avoid unnecessary movements to keep viewers focused on the important parts of the screen.
- Use zoom and highlight features to draw attention to key areas of the display.
Screen Recorder
Easy to use free screen recorder for PC. Record desktop, take screenshots, upload the created content to the cloud for easy and fast sharing.

FAQs on how to screencast
Can I record both system audio and my voiceover while screencasting? Yes, most screencasting software allows you to record audio simultaneously with your screen recording. Just make sure to use a good-quality microphone for clear audio. How much storage space do screencasts take up? As a rough estimate, a 10-minute screencast at 1080p resolution with a standard frame rate and moderate compression might occupy around 500 MB to 1 GB of storage. However, this is a generalization, and actual file sizes can vary. How long should a screencast be? Aim for a duration that keeps viewers engaged, typically between 5 to 15 minutes. Adjust based on the complexity of the content. What video resolution should I choose for screencasting? 1920x1080 (1080p) is a popular choice for screencast videos as it provides good video quality while maintaining a reasonable file size.
Conclusion
To summarize, screencasting offers a valuable means of generating instructional videos, capturing presentations, and showcasing products. This ultimate guide has walked you through the essential steps, tools, and techniques to create compelling screencasts.
With practice, you will become more confident and efficient in your screencasting skills. Keep in mind the importance of clear audio and visuals, as well as engaging with your audience. And most importantly, have fun with it!
Editor-in-Chief at Icecream Apps
With experience spanning over several years, Alexandra Meyer holds the esteemed position of editor-in-chief at Icecream Apps. Originally involved in the website's establishment in 2014, Alexandra now ensures the maintenance of the company's exceptional content standards across their various projects. Specializing in technology, software, online services, and human resources, she has extensively written and edited numerous articles on these subjects.


